Image Map
Showing posts with label technology. Show all posts

Tuesday, July 21, 2020

Lesson Plan Template Tutorial - Lesson 2

Last week I posted how I use Powerpoint to display my lesson plans each day along with directions on how to do it yourself. Today, I'll share how to follow this same process on Google Slides. I personally prefer Powerpoint when teaching in person, but when we transitioned to virtual learning in March I switched over to Google, since that is what all my students had access to. Having these lessons made it easy for students to follow their normal music routine, while also allowing me to include recordings, videos, and more.

If you did not see the tutorial for Powerpoint and would prefer that method you can find that blog post by clicking HERE

  1. Start with an empty slide. You'll see below that I made mine decorative and inviting, but this is definitely NOT a necessity. I started with plain backgrounds about 8 years ago.
  2. Click insert and add a text box in the blank area of your lesson plan template. You can add your lesson plan information in that area.
  3. When you are done entering your lesson plan information it may look something like this (minus the bitmoji and shape in the corner):
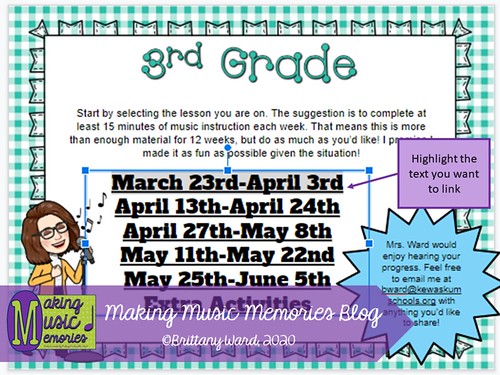
  4. Once you have your lesson plan typed up you can hyperlink text to a different file or video. In order to do this you want to highlight the text
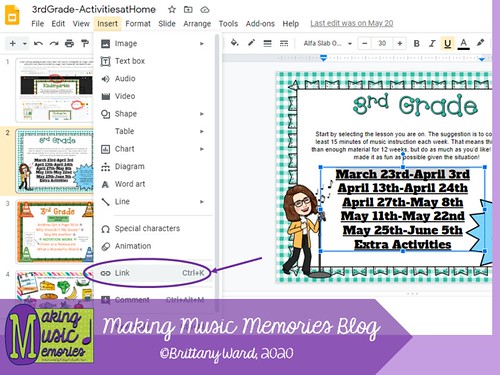
  5. Click "insert" then "hyperlink"
    Slide5
  6. You'll receive a pop-up that allows you to enter the link to another website or click "slide in this presentation" to select a slide in your current Google Slide project.
    Slide6
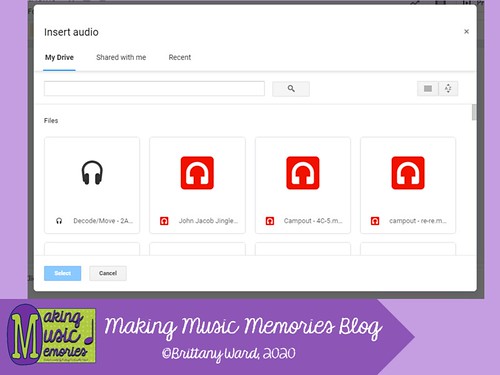
  7. To add an audio file select "insert" and then "audio". Make sure the audio file you want to use is already saved in your Google Account otherwise you won't be able to add it. You'll also want to make sure the audio file is shared to everyone with the link. Otherwise, you'll have issues with students not being able to play the song. (If you need a tutorial on this I'd be happy to do one in the future.)
    Slide7
    Slide8
  8. When you are finished you will see a speaker appear like you see below:
    Slide9
Hopefully this tutorial helps you get started.

Below is a link to my Lesson Plan Templates that I created if you are interested in using them instead of creating your own. My full version will be on SALE for the next few days. ENJOY!
Lesson Plan Templates - Full Version Lesson Plan Templates - Freebie

New-Signature-2020

Thursday, July 16, 2020

Lesson Plan Template Tutorial - Lesson 1

Years ago I wrote a blog post about how I create a tech lesson plan to project on my SMARTboard. You can read that original post HERE. Since then I have continued to do this to save time and energy and make use of every second of class time. Some ways this helps in my classroom:
  1. It provides a visual schedule for students to keep track of what needs to get done and I avoid the "What are we going to do today?" questions
  2. I can link video clips, audio clips, and even attach extra projected files with hyperlinks
  3. It is something pretty for me and my students to look at

If you do not want to start from scratch and would like some cute backgrounds to start with you can download my pre-made Lesson Plan Templates. I have a free version that provides one background for Kindergarten-5th Grade, as well as a version with multiple different backgrounds for purchase. Please note that this is NOT necessary. I personally choose to have a different background each month to keep things fresh, but you could definitely keep the same background for the whole year or even just have a blank slide. That is how I started. Links for my backgrounds are at the end of this blog post. (See below to see a picture of my title page for an April slide):
April Title Slide

Today, I will start with some of the first steps you should follow on PowerPoint or Keynote to get started. You also can do this in Google Slides and I'll put up a second tutorial with how to do this in Google Slides. I found this strategy helpful when teaching online this spring. I could send them the Google Slide lesson plan with linked videos, games, activities, audio files, etc.

  1. Begin with your blank slide that you want to list your lesson plans on. Here is an example of what mine looks like:
    Empty Slides
  2. Click insert and add a text box in the blank area of your lesson plan template. You can add your lesson plan information in that area.
    Adding a Textbox
  3. When you are done entering your lesson plan information it may look something like this:
    Prepared Slide with Lesson Plans
  4. Once you have your lesson plan typed up you can hyperlink text to a different file or video. In order to do this you want to highlight the text and click insert hyperlink.
  5. You'll get a prompt like you see below and you can click the file you see or browse for another file. When you have selected the file you want then click "ok".
    Hyperlink to a different file
  6. You could also hyperlink the file to a different slide in your lesson plan presentation. To do this click "insert", then "hyperlink", then click "place in this document", select the slide you want it to go to, then click "ok".
    How to Hyperlink to a different slide
  7. Another great use of this is to add an audio file to your presentation. I like to do this for adding folk dance music, beat motion songs, or a piece of Classical music we will be listening to. Not matter what you want it is simple to add. Click "insert", "audio", select whether you want something from your computer or you are recording it yourself, then click "ok".
    Adding an Audio File
  8. When you are finished you will see a speaker appear like you see below:
    Audio Added
Hopefully this tutorial helps you get started. I will create another blog post soon to give directions on how to do all of this on Google Slides for those interested in using Google Slides instead.

Below is a link to my Lesson Plan Templates for download on my Teachers Pay Teachers Store. My full version will be on SALE for the next few days. ENJOY!
Lesson Plan Templates - Full Version Lesson Plan Templates - Freebie

New-Signature-2020

Tuesday, October 15, 2013

2/4 Tuesday - 2 Techie Tips!

Welcome back for another 2/4 Tuesday! I'm so glad that Steph is still running this. It really helps me stay on track and helps me post at least once a week.

Today, I wanted to talk about two Techie Tips that I don't know what I would do without:


The first one is using Dropbox. You can see it by going to http://www.dropbox.com. This file sharing service is completely free and allows you to save files to the internet. You can also connect your files to your computer at school, your computer at home, your smartphone, and your tablet. This is a serious lifesaver for someone who teaches at two different school like I do. I can save my lesson plans, my SMARTboard files, and everything else! It is so nice to be able to create, edit, and save files from any of my computers and not have to worry about emailing the files to myself, carrying around a usb drive, or anything else. Especially because it is so easy to forget and then you suddenly don't have the files you need.

My second techie tip is for teachers that use a lot of SMARTBoard files, Powerpoints, Websites, etc. I learned this from a colleague a couple years ago and it really helps cut down on the amount of prep I have to do from class to class. Here is how it works:
  1. Create a new SMARTboard file that I normally label as Lesson Plans, but you could label it as anything you want.
  2. Create a page for each of your classes. This could be one for each class or one for each grade, just depends on how detailed you want it
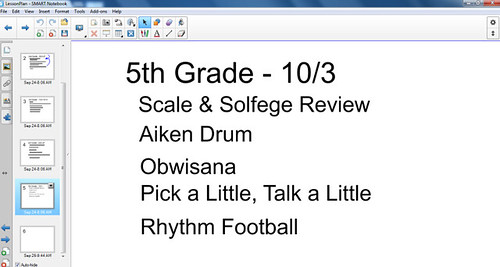
  3. List out the activities you are going to use for each class. (Make sure that each one is a new text box)
    listedactivities
  4. Now that you have the activities listed out it is time to link them up!
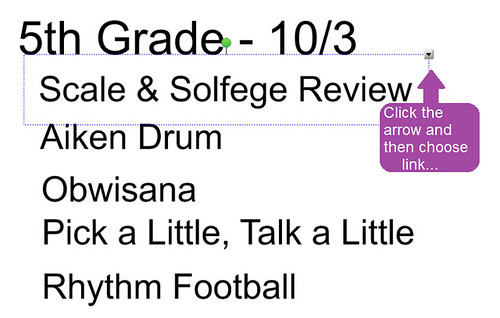
  5. Click on the arrow and press 'Link...'
    clickarrow
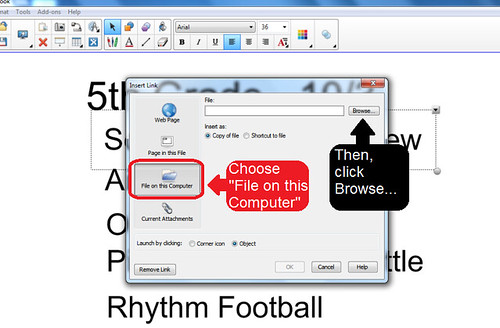
  6. Click 'File on this Computer' and then 'Browse...' for the file you need
    fileonthiscomputer
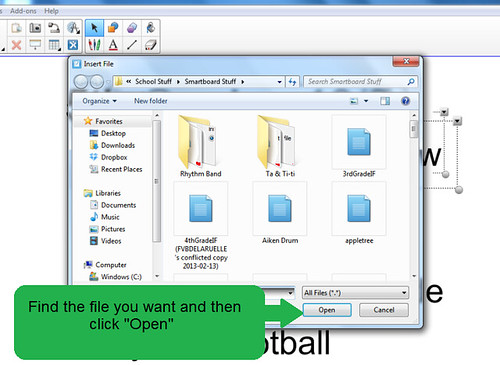
  7. Once you find the file you need clip 'Open'
    open
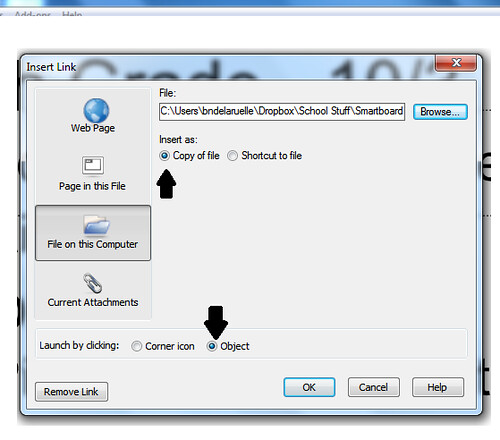
  8. Choose between 'Corner of Object' and 'Object'. I normally choose 'Object' which links the words to the file, but if you click 'Corner of Object' you will see a little paperclip in the corner. You also need to choose between 'Copy of file' and 'Shortcut to file'. Make sure to choose 'Copy of file' for this. It will open much faster!
    objectandcopy
  9. Continue these steps until all your files are linked up to your original lesson plans
Now all you have to do is open your Lesson Plan file and all your SMARTBoard files will be linked to it. This will save you tons of time as you won't have to be searching for all your files all the time. You could also link up to a worksheet that you are going to do, a PowerPoint you want to show, and even link to a website if you are going to show a video. The only change you have to make for a website is you won't be clicking 'File on this Computer' but instead 'Webpage' and then just put in the URL! I just LOVE technology. (Unless it is being a bugger!)

In totally unrelated news, I have gotten to 11 followers on my Teachers Pay Teachers account and over 80 of you have downloaded my Halloween Rhythms Freebie from Sunday! I'm so glad to see so many of you taking advantage of this fun composition/rhythm practice work. My 1st and 2nd graders have been playing with these the last few days and they are really enjoying it. Be sure to rate the product when you get a chance! I would love to know what you think and if you think there needs to be some improvements. If you haven't picked up this free download you still can at my Teachers Pay Teachers account HERE!

Wednesday, January 16, 2013

Have You Been to Melody Street?

One of my favorite things to teach about are the instrument families and the various instruments. I teach this unit in three sections:

3rd grade learns about the four instrument families and the instruments from the orchestra that belong to these four families. We focus on the characteristics of each family and talk about how non-orchestra instruments would also fit into the four families.

In 4th grade we add on to their knowledge about the four instrument families and we focus more on the sound of each instrument and their particular instrument family. We talk about the word timbre and we learn how to describe music using various timbre words.

Finally in 5th grade we talk about various ensembles and how different ensembles use different groupings of instruments. They have to use their knowledge of instrument families and instrument timbres to arrange instruments into various ensembles. Some of the ensembles we focus on are concert band, orchestra, jazz band, and

This year, I'm more excited to teach instrument families than I have EVER been before. This is due to some of the amazing resources I have found. There are so many great youtube videos and games I plan on using for this unit. I'll share different ones in the next few days and weeks, but I'll start with one I have been using with my 3rd graders.

Last summer, I stumbled upon this gem. It is a story called Melody Street. Some of you may have already heard of it. It is a story about the instruments of the orchestra and it plays the sounds of the instruments as the story is read to the kids. The story is in three chapters and I find it to be very interesting.


When I first found the story, I was a bit worried about using it. I was excited, but 3rd graders can be so fickle at times. I love teaching 3rd grade, but they tend to be in that stage where some things are now too 'kiddie' for them. I decided to be brave and just try it this year as an introduction into studying the instrument families. To my delight they LOVED the story and many of them stated "That was really good!"

We have been reading the story in chunks. We read the first chapter the first day and then we got through part of the 2nd chapter. The only thing that bothers me about the story if you cannot start in the middle of a chapter. I want the kids to have the full experience of hearing all the instruments playing, but I am not sure how to finish the chapter without starting all over. (The second chapter is about 15-20 minutes!)

Anyways, there is also a Melody Street site with different music games and activities. One I particularly find useful and will probably use with one of my classes is one where the students have to identify the instruments by sound.


Hope you enjoy these resources as much as I do. Do you have any other cool instrument sites to share?

Wednesday, October 31, 2012

Describing Music using Music Terminology

One of the things I'm really working on with my older students (3-5 grade) is describing music using musical terms. I explained to one of my principals that I feel this is an important skill that can really help students appreciate music in a whole new way. How cool is it when a student can pick out instruments in a pop song or describe differences in tempo. This is a skill that all kids can learn and use even if they never continue on in music.

I first emphasized this skill during our outdoor music classes (read more...).

When we went outside I had my students sing I Love the Mountains. Later, I had my students write a short reflection on the difference of sound singing outside verses inside. They were encouraged to use music words from the word wall.

Most of the reflections said things like:
  • The sound echos more inside than outside
  • We sang quieter outside rather than inside
  • There were other noises outside like leaves rustling and birds chirping
  • Our sound was much more blurred together outside

After this reflection I realized I really needed to show students HOW to use music terminology in their reflections without having to change what they are saying. In order to do this I came up with a reflection assignment students had to do for homework. (I rarely give homework, but this was a simple assignment and they were given 2 weeks to complete it)

First, I showed students some examples of reflections they wrote:
I Love the Mountains sounded different outside because it echoed less outside than inside. I also thought we sang a lot quieter outside. I also noticed that outside the music was much more blurred together where as inside it was much more disconnected.
Then, I showed them how they could just substitute a few words for music words and it still was saying the same thing.
I Love the Mountains sounded different outside because it echoed less outside than inside. I also thought we sang at a piano dynamic outside. I also noticed that outside the music was more slurred or legato rather than inside where it was much more staccato.
Finally, I gave them the assignment (this was partially an idea I was given by my school principal to also include some technology):
Students should write a short music reflection about a song that they have listened to during the month. This allows students the opportunity to listen to any song they enjoy and still be practicing writing and using music terminology. *NOTE:I even allowed non-school appropriate songs as long as they had permission from their parents. That way they could truly listen to whatever kind of music they like*

All responses were emailed to me unless they could not because of not having internet or computer access at home. I also printed out a few paper copies for these students, but they were responsible for picking them up from me.

I posted all information on my school website so students could access it at anytime. Along with this I posted: the questions they were to answer, links to music videos they may like to watch for the assignment, a word bank of musical terms to use in their reflection.

This assignment was due by Halloween and I do have to say it was such a fun experiment. I did have quite a few students that I was constantly hounding to turn in their assignment (what is new), but the responses were great! I also had quite a few students that were really excited about the assignment and enjoyed the videos I posted. It was also a great way to include technology and writing into my curriculum. (Two school goals for Fairview Elementary.)

You can see all the directions for the assignment, video links, and word bank all on my school website -->here<--. Feel free to steal the idea and even the word bank, just let me know how it works for you. :)

Happy Halloween! BOO!

Tuesday, September 25, 2012

Tweet for Education

Twitter

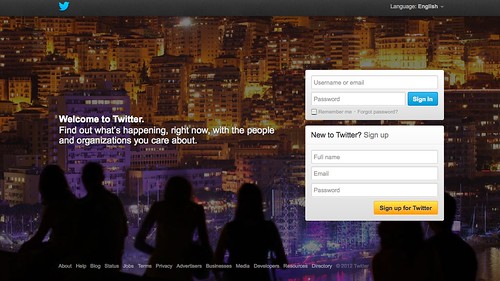
I decided to write a blog post about tweeting, since last week we had a mini-in-service about the significance of tweeting as a professional practice. Now I know what some of you are thinking: How can you use Twitter as a professional practice? How will it better your work? What should you tweet about? What does it mean to follow someone or be followed? These are all questions I will try to answer in this post.

I myself am of the 'younger' generation. I'm what some refer to as a millennial or generation Y. The millennial generation are typically people born anywhere from the late 1970's through 2000. Millennial kids are generally marked by an increased use and familiarity with communications, media, and digital technologies. This means I have no qualms with using new technology and am constantly finding ways to use new technology in my music room. (I already have a smartboard at both schools and recently was given an iPad to use in one of my classrooms. I'm sure you will see more about this technology later in the year as I find ways to use it.)

Though I am excited about using technology in my classroom, I will admit I was a bit skeptical of twitter at first. How can you really learn anything just from 140 characters or less? However, I have found that many do not just post random things like "Today my job was super great!", but instead, they post things like "Today I played an awesome #music game with my students! Check it out (URL here)! #musiced #musedchat" They then link their post to a blog they wrote or read somewhere. These types of tweets can be really helpful.

How do you find relevant posts? By using the search bar. You can put in words or hashtags into the search bar. Hashtags are made up tags that connect people that are talking about the same thing. Some important hashtags to know, if you are a music teacher: #musiced, #musedchat, #music, and #musedmot. By searching for these hashtags you will see ALL of the posts related to that topic. You can then read different posts people made and eventually decide to follow them. To follow someone just use the simple steps highlighted below:

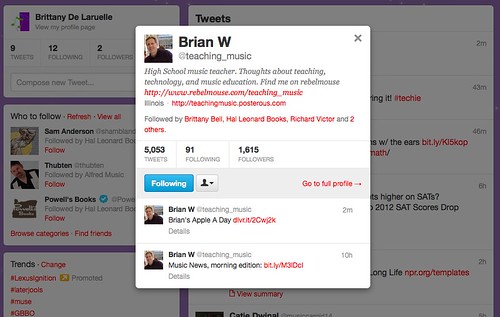
1) Find someone interesting and click on the post:
Step1

2) That will open this mini-menu:
step2

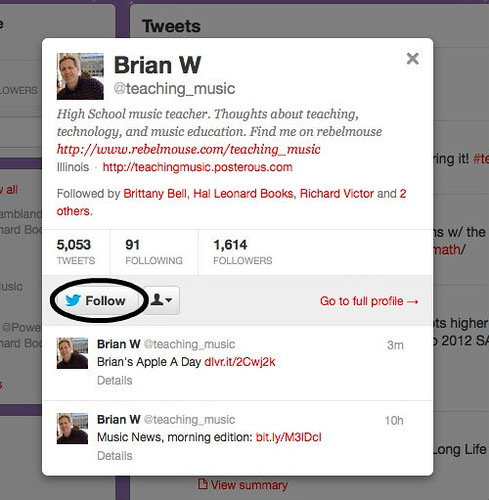
3) Click the FOLLOW button:
step3

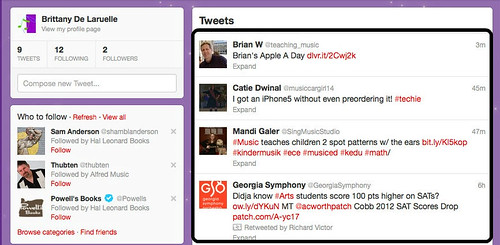
As you follow more people you will get more tweets here in your tweet feed:
step4

If you are being followed they are getting your posts!

Now, you are making links with interesting people and hearing what they find to be interesting through retweets.

What is a retweet? Well, when you find something super interesting (which believe me you will!) just click the retweet button as shown below:
retweet1

After you retweet it, all YOUR followers will see it, too! You will also see things that your followers retweeted, which eventually can connect you to more professional music teachers! (Isn't social networking fun?)

After spending just ONE week on Twitter, I have read MANY articles about music advocacy. I have found tips for parents to use music at home. I have found ways to network with other teachers. I have found teaching tips. All of that in just ONE week. (And I only am following 12 people and followed by 2). Start small and just keep building. The more people you start following the more people that will start following you.

What should you tweet about? Anything you want to share! Wrote a recent blog post? Tweet about it! Did something awesome in your classroom? Tweet about it! Looking for helpful tips? Tweet about it! Just make sure you add hashtags so other people can find your posts! It is also okay to not tweet anything and just follow people. However, I am guessing once you start tweeting you won't be able to stop.

One more thing, while following tweets this last week. I stumbled upon something AWESOME! Apparently, there is a music education motivation day planned for September 29th. I don't know a whole lot about it, but you can learn more here. You can also look up #musedmot on twitter to find it!

Have you used twitter as a professional tool? If so, who do you follow and what have you learned or found? Have you ever considered using twitter as a way to grow professionally? Feel free to follow me @bndelaruelle and I may follow you back.

Friday, August 10, 2012

What Did You Learn?

Whenever I can find the time at the end of a day, unit, class, etc. I like to ask my students a few questions about the class. I do this for a number of reasons. First of all, I like to know what students enjoyed the most about the class. I also want to know what they enjoyed the least. This is not to say that I will get rid of what they enjoyed the least and keep what they enjoyed the most. It is just my way of getting student input and it helps me plan for the future. I also like to ask students what they learned from taking this class. If they can't tell me anything they learned, then what was the purpose of taking the class?

The last day of summer school, I only had the first hour class, which was my Fun with Technology class. We had a few minutes at the end of the class, so I asked them these questions about their experiences in the class. I was pleasantly surprised with the results.

The first question was what they enjoyed most about this class.
Here were some of the answers:
  • Creating pictures for the Goldilocks project
  • Having time to play different puzzle games online
  • Using powerpoint for the first time
  • Adding animations to their presentations
  • Presenting their animations

The second question was what did they enjoy the least about the class. The majority answer for this was of course the typing practice. This was not surprising to me and I told my students that typing practice was one of my least favorite activities in computer class, too. However, it is important and helps you type faster and faster over time.

The final question: What did you learn?
Here are their answers:
  • Homerow for typing
  • How to animate on PowerPoint
  • How to add pictures to a PowerPoint
  • How to add additional slides in PowerPoint
  • How to add and delete transitions on a PowerPoint
  • How to export images in Pixie
  • How to add stamps, pictures, and cool effects in Pixie

It is so exciting to hear about all the great things they learned in class. It makes teaching the class a success!

If I were to teach this class again, I would definitely keep the format of the class the same. I liked that the students had time to practice typing, play games, and work on a project every day of class. I feel like it was the right balance of work and play for the students.

I really liked the project, but would probably change it for next year so that the same students could take the class again if they liked. I would want to continue to include PowerPoint and Pixie in the project as these seemed to be big hits with the kids. Maybe even a project that really focused on all the cool things that PowerPoint can do. I think the kids would really like that.

That is all for now!
Thanks for reading,
~Brittany De Laruelle

Thursday, July 26, 2012

Goldilocks Final Project Pictures

Summer school ended last week Friday. I still have a lot I would love to share with all of you, and I promise I will. However, I decided it would make the most sense to finish talking about Fun with Technology before moving on to the next summer school class I taught (Fun in the Sun).

Last week, students finally finished their Goldilocks project I told you about earlier. They then were allowed to share them with their classmates. I was happy to see that everyone that came to school last week DID share their projects with the class. This was very important to me as they did spend four weeks working on them. However, I have learned from experience that sometimes it is better to not FORCE students to share, but instead encourage everyone to share. This normally makes kids feel like they have a choice, but they normally get so excited after watching everyone else share, that they want to share their work, too.

(Note: There are times I EXPECT everyone to share. However for something like this it is not necessary and the kids are willing to share on their own.)

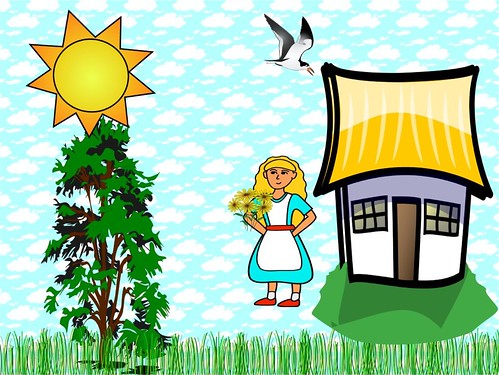
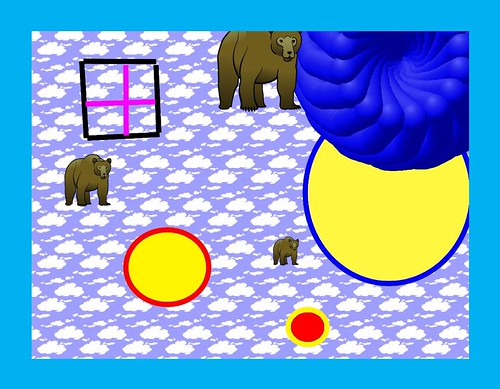
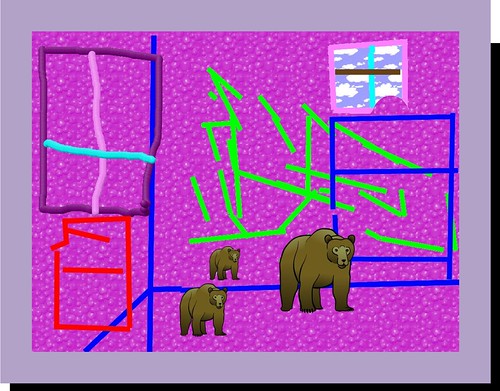
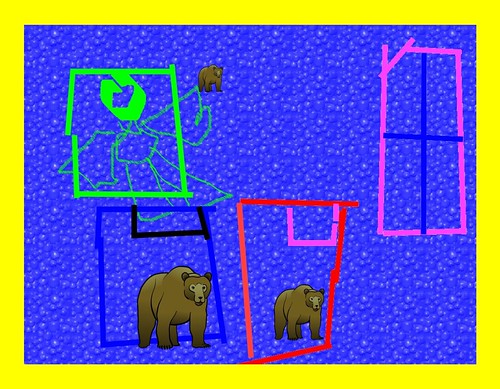
Just to give you an idea of the great work my students did, here are some examples of pictures the students created for the story:


-Goldilocks Final Project Pictures-

There once lived a little girl who was called Goldilocks because her hair shone like gold. She was very fond of wild flowers and often went into the woods to pick them.

One day she walked and walked, and was soon a longer way from home than she had ever been before. In fact, she was lost. But she hurried on, hoping to meet someone who might be able to tell her how she could get home.

On and on she wandered and finally in a particularly lonely spot she happened onto a neat little house. It was really the house in which lived the three bears -- the Papa Bear, the Mama Bear, and the little Baby Bear -- but of course Goldilocks didn't know that.

The little girl went up to the door and knocked. There was no answer. She knocked again. Still no answer. And so she opened the door and went in. She was very tired and hungry.


Goldilocks looked around, and saw a little table set with a nice white cloth, and on the table were three bowls -- a big blue bowl, a middle-sized bowl, and a little yellow bowl. These three bowls belonged to the Papa Bear, the Mama Bear, and the Baby Bear.

Goldilocks lifted up the covers to look into the bowls. Each was full of delicious-smelling porridge which the three bears had left there to cool while they went for their early morning walk in the woods. Later they would return for a hearty breakfast.

Goldilocks picked up the spoon which was in the big blue bowl and tasted the porridge belonging to the Papa Bear. It was very hot, much too hot for the little girl to eat.

The little girl then turned to the red bowl and tasted the porridge that belonged to the Mama Bear. It was much too cold.

But there was still another bowl, and Goldilocks dipped her spoon into the porridge in the little yellow bowl, the one that belonged to the Baby Bear. How good that porridge smelled!

Goldilocks tasted it. Um-m-m-m! It was just right, and so she ate and ate and ate until there was not a bit of porridge left in the Baby Bear's little bowl.


After having eaten, Goldilocks wandered into the living room to sit down. There along the wall stood three chairs -- a big chair, a middle-sized chair, and a little chair.

She tried the big chair, which belonged to the Papa Bear, but it was too high, much too high for such a little girl.

Then she tried the middle-sized chair, which belonged to the Mama Bear, but it was too wide, much too wide for Goldilocks.

There was still a third chair, the one that belonged to Baby Bear. It was a cozy little chair with a green leather seat, and it looked like a very good chair for a tired little girl to rest in.

And so Goldilocks sat down in the Baby Bear's chair. It was just right, and she sat so hard that she broke it. The little girl got quite a surprise when she tumbled to the floor, but she immediately picked herself up and decided she would go upstairs and look around. She was quite sleepy by now, and maybe she could find a nice bed upon which to lie down.


Then Goldilocks climbed the stairs to the bedroom, and there found three beds -- one for the Papa Bear, one for the Mama Bear, and one for the Baby Bear. They were all fresh and clean.

Goldilocks lay down on Papa Bear's great big bed, but it was too hard.

Then she tried Mama Bear's middle-sized bed, but it was much too soft.

There was still a third bed -- Baby Bear's bed -- with a pink and white spread on it. Goldilocks tried the littlest bed, and it was just right, and so she curled up and was soon fast asleep.


Now while Goldilocks was sleeping, the bears came home from their walk.
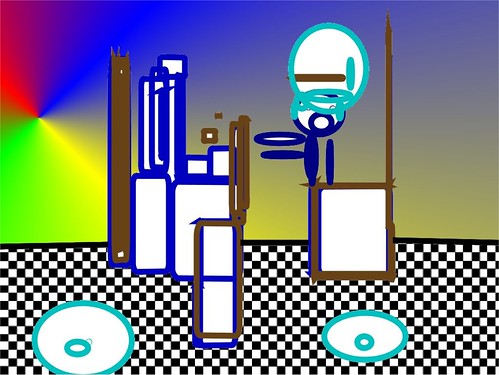
They were very hungry and went at once to the kitchen to eat their porridge.
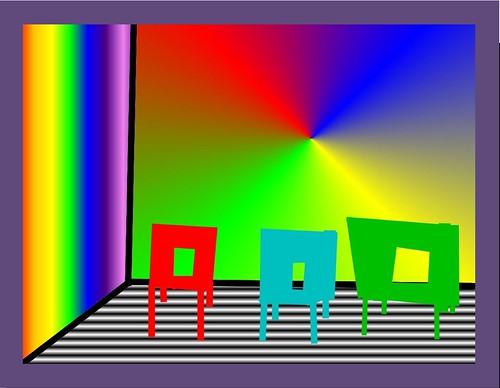
The Papa Bear had picked up his spoon and was about to begin eating when he suddenly growled in his big-bear voice, "Somebody has been eating my porridge!"

When the Mama Bear saw her bowl, she said in her middle-sized bear voice, "And somebody has been eating my porridge, too!"

Baby Bear saw his empty bowl, and began to cry. "Somebody has been eating my porridge, and has eaten it every bit!" he wailed.


Then the three bears went into the living room to sit down and rest.

Papa Bear noticed that his chair had been pulled out of its usual position.

"Somebody has been sitting in my chair!" he grumbled in his gruff voice.

"And somebody has been sitting in my chair!" said Mama Bear.

Baby Bear began crying harder than before. "Somebody has been sitting in my chair and has broken it all to pieces!" he sobbed.

Baby Bear had no chair to sit on, and so the three bears decided they would go upstairs to rest. They would take a short nap.


As they entered the bedroom Papa Bear glanced at the big bed. "Somebody has been tumbling in my bed!" he growled.

"And somebody has been tumbling in my bed!" said Mama Bear in her turn, walking over to the middle-sized bed and carefully smoothing the spread, which was quite rumpled.

All this time Baby Bear had been staring hard at his own little bed. Finally he found his voice and piped up, "Somebody has been tumbling in my bed, and here she is!"

At the sound of the Baby Bear's voice the little girl awoke with a start. She sat up and glanced about her. Then she sprang out of bed, and dashed down the stairs and out of the house as fast as her legs would carry her.

And Goldilocks never, never went near the house of the three bears again.


---------------------------------------------------------------


Each of the pictures above is from different students, so they do not all necessarily go together. However, you can get an idea of what students did to represent this story.

I hope you enjoy the creativity and expression of my students' work.

Thursday, July 19, 2012

Animations and Transitions

Once students completed, exported, and transferred all their pictures onto the Powerpoint (which took about 3 1/2 weeks) they were finally ready to do the 'fun stuff' - animating their PowerPoints. Many of the students in my class had never even worked in PowerPoint, so they had no idea how to add animations or transitions. The directions were they had to have at least one animation and/or transition for each slide.

In case you aren't familiar with how to use PowerPoint, here is a short tutorial using PowerPoint 2010.

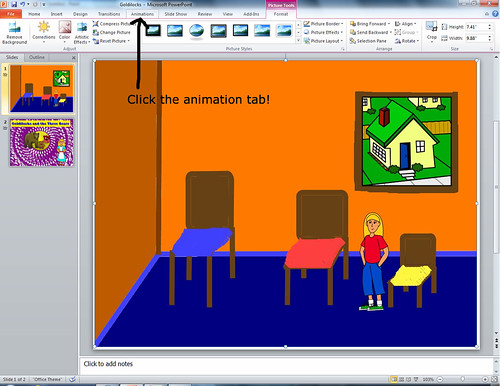
1) Click the animations tab:
PPAnimation1

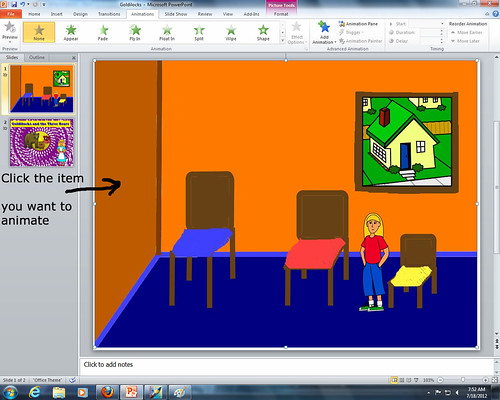
2) Click the item you want to animate:
PPAnimation2

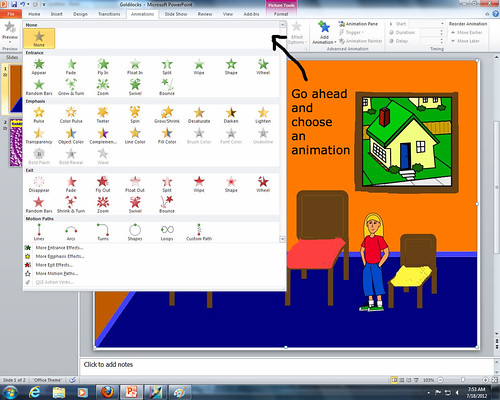
3) Use the drop down menu to show you all your different options. Notice that the green would be entrances, yellow stress, and red exit. It is best if you do not choose several entrance or several exit animations, otherwise you will end up with a lot of clicks that show nothing. :(
PPAnimation3

3) Once you choose an animation it may give you other choices to the right of it. These choices could affect the direction or how it works. It is pretty cool!
PPAnimation4

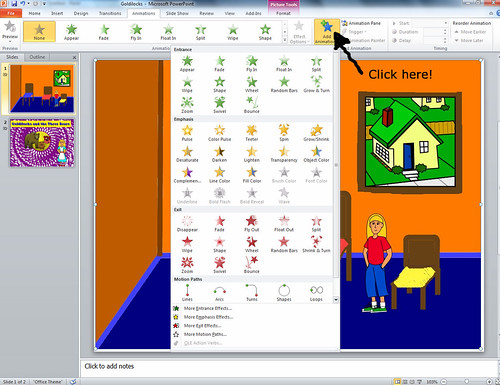
4) If you want to add another animation make sure to click the 'ADD ANIMATION' button. If you do not it will only allow you to have ONE animation per item.
PPAnimation4half

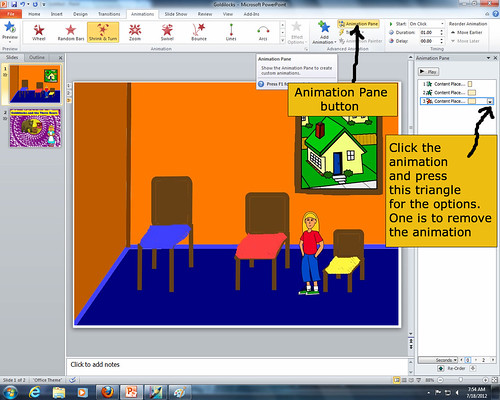
5) You can remove animations or reorder animations by clicking the 'ANIMATION PANE' button.
PPAnimation5

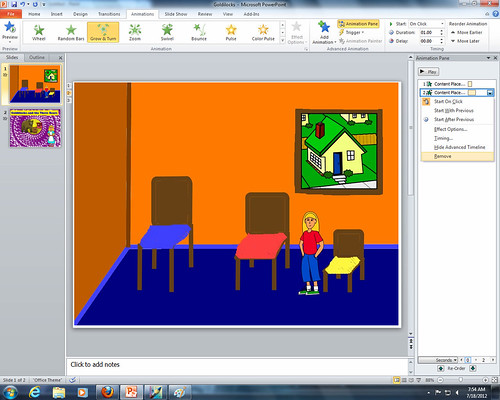
6) Move the icons around or click the arrow and remove the animation altogether.
PPAnimation6

Along with animating your slides you can also add transitions between slides.

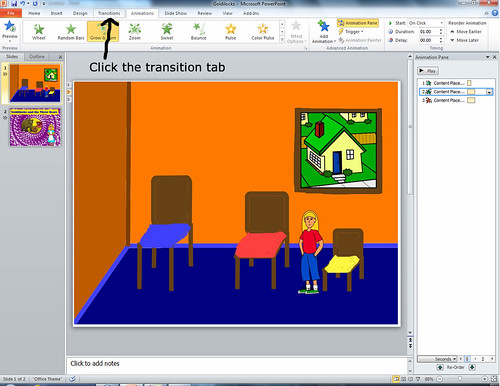
1) Click the transition tab:
PPTransition1

2) Click to expand the menu and choose from the many options:
PPTransition2

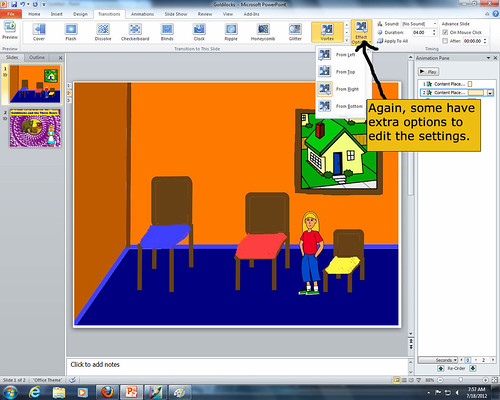
3) Some have extra settings that you can manipulate, just like the animations:
PPTransition3

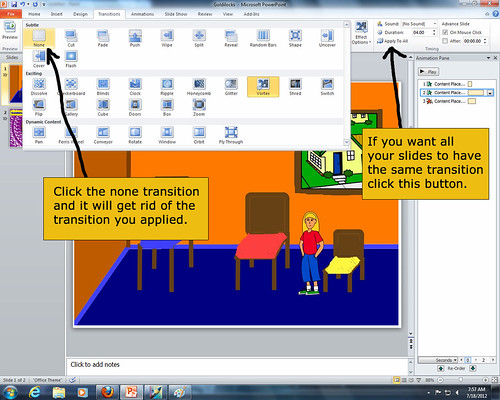
4) You can get rid of the transition by clicking the none option. You can also apply the same transition to ALL the slides by clicking the 'APPLY TO ALL' button:
PPTransition4

After about 2 days of playing on PowerPoint, students were ready to share their final projects. It was really cool to see what they created.

I hope you found this helpful and I look forward to sharing more of my teaching experiences with all of you in the future.

What are you waiting for? Go create a PowerPoint of your own!
Brittany